This is hoppala

hello world: Mobile AR with Layar & Hoppala

Monday, March 28th, 2011

Welcome! This tutorial will show you how to create mobile AR using the Layar platform and Hoppala CMS service, with no programming required. I’ve kept it simple on purpose — both Layar and Hoppala have additional capabilities you should take the time to explore; for the technically inclined, the Layar developer wiki is a good place to start.

Mobile Augmented Reality for Non-Programmers
A Simple Tutorial for Layar and Hoppala

1. What you need to create your first mobile AR layer:

* A smartphone that supports the Layar AR browser. This means an iPhone 3GS or 4, or an equivalent Android device that has built-in GPS and compass. As of March 2011, Symbian S3 and S60 devices should also work, as should the Apple iPad2.
* The Layar app, downloaded onto your device from the appropriate app store.
* A computer with web access.

2. Get connected:

You’ll need to create a developer account with Layar and an account on the Hoppala Augmentation content management system (CMS). This should only take a few minutes:

* The Hoppala website: http://augmentation.hoppala.eu
* The Layar developer website: http://layar.com/publishing

Once you have your accounts, sign in to both sites and to the Layar app on your device.

3. Get started:

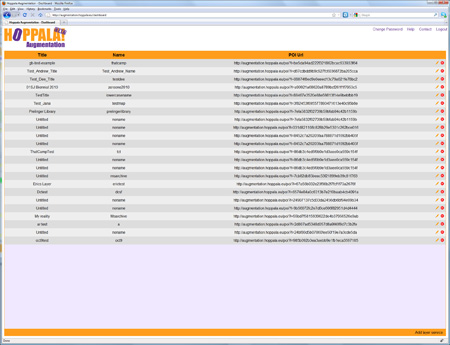
When you log into Hoppala, you should see the Dashboard, a simple list of your layers with Titles, Names and Overlay URLs.

Hoppala dashboard

At the bottom right of the page, click Add Overlay to create a new layer. A new entry will be added to the list, with Untitled, noname and a long, ugly URL. On the far right of that entry line, click the pencil icon to edit and give your layer a new title and name. The name needs to be all lowercase alphanumeric. Click the Save button.

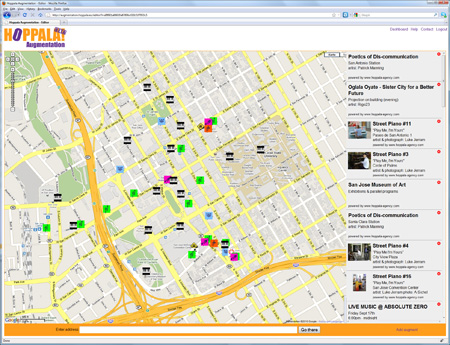
Next, click on the name of your new layer. This will open a Google Map-based page. Use the map controls or enter your address to navigate to your current location and zoom in.

Hoppala map view

To add a point of interest (POI), click Add augment at bottom right of the page. This will add a basic POI called Untitled in the center of the map. You can drag it to the location you want.

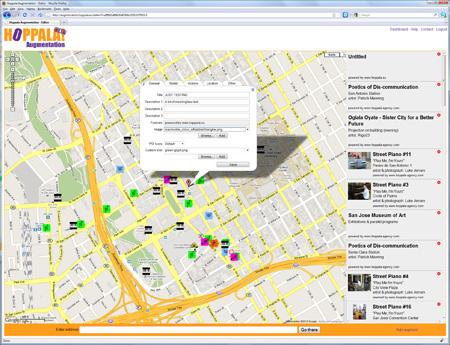
To customize your new POI, click on the red map pin and a popup will open. The popup has 4 tabs, labeled General, Assets, Actions and Location. Each tab is a form we will use to enter data about the POI. For now, don’t worry about the Location tab.

Hoppala POI menu (click for larger view)

GENERAL

* The title and description fields can be whatever text you want. The title is limited to 60 characters, and each description line can be 35 characters. Note that long text strings may not display fully on a small device screen. Try typing HELLO WORLD as your title.
* Thumbnail is the picture that is displayed in the POI’s information panel in the mobile app view. You can upload your own thumbnail from your computer by using Choose File and then Add.
* You can ignore the Footnote and Filter value fields for now.
* BE SURE TO CLICK THE SAVE BUTTON and wait for the confirmation.

ASSETS

* Icons are the small graphics that show up in the AR view for basic POIs. Choose default (you can create custom icons later if you like).
* Assets are 2D images or 3D objects that appear in the AR view. You can upload your own assets using Choose File and then Add. Images can be .jpg or .png; 3D objects must be in Layar’s .l3d format.
* Note that Hoppala supports some non-Layar AR browsers. You can ignore any sections for “junaio” and “Wikitude”.
* BE SURE TO CLICK THE SAVE BUTTON and wait for the confirmation.

ACTIONS

* In the Layar browser, you can have actions triggered from POIs. These can include going to a website, playing an audio or video, sending a tweet, an email or text, and making a phone call.
* Hoppala allows you to include up to 8 actions per POI.
* Actions can appear as buttons for the user to click, or they can be auto-triggered based on the user’s proximity to the POI location.
* Try adding a link to a website. For Label, type Google. Select ‘Website’ in the pulldown menu. Type http://google.com for the URL.
* BE SURE TO CLICK THE SAVE BUTTON and wait for the confirmation.

You can add more POIs, or move on to configuring and testing the layer.

4. Configure your layer:

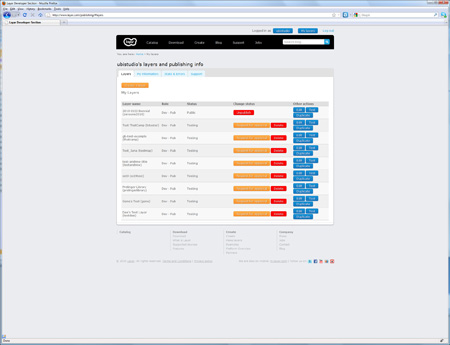
Log into the Layar developer site. At the top right of the page, click My Layers and you will see a table of your existing layers, if any.

Layar Developer Site (click for larger view)

To add your new layer, click the Create a layer button. You will see a popup form.

* Layer name must be exactly the same as the name you chose in Hoppala.
* Title can be a friendly name of your choosing.
* Layer type should be whichever type you have made. If you used a 2D image or 3D model as an asset, select ‘3D and 2D objects in 3D space’.
* API endpoint URL is the URL for your layer, which you can copy from the Hoppala dashboard (the long ugly one).
* Short description is just some text.

Click Create layer and you should be done!

(There are lots more editing options, but you can safely ignore them for now).

5. Test your layer:

Start up the Layar app on your mobile device. Be sure you are logged in to your Layar developer account, or you will not see your unpublished test layer. Select LAYERS, and then TEST. You should see your test layer listed. Note: older versions of the Layar app may put the TEST listing in different places, so you may need to poke around a bit. Select your layer and LAUNCH it. Now look for your POIs and see if they came out looking the way you had expected.

Congratulations, you are now an AR author!

experiments in historical augmented reality

Sunday, November 14th, 2010

In collaboration with Adriano @Farano, I’ve been experimenting with creating historical experiences in augmented reality. Adriano’s on a Knight Fellowship at Stanford, and he’s seeking to push the boundaries of journalism using AR; my focus is developing new approaches to experience design for blended physical/digital storytelling, so our interests turn out to be nicely complementary. This is also perfectly aligned with the goals of @ubistudio, to explore ubiquitous media and the world-as-platform through hands-on learning and doing.

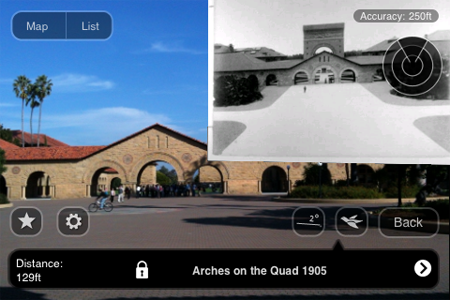
Adriano’s post about our first playtesting session, Rapid prototyping in Stanford’s Main Quad, included this image:

Arches on the Quad 1905

Taken from the interior of the Quad looking toward the Oval and Palm Drive, you can see that the photo aligns reasonably well with the real scene. Notably, the 1905 picture reveals a large arch in the background, which no longer stands today. We later found out this was Memorial Arch, which was severely damaged in the great 1906 earthquake and subsequently demolished.

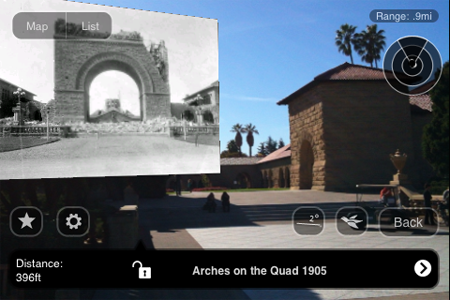
In our second playtesting session, we continued to experiment with historical images of the Quad using Layar, Hoppala and my iPhone 3Gs as our testbed. Photos were courtesy of the Stanford Archives. This view is from the front entrance to the Quad near the Oval, looking back toward the Quad. Here you can see the aforementioned Memorial Arch in 1906, now showing heavy damage from the earthquake. The short square structure on the right in the present day view is actually the right base of the arch, now capped with Stanford’s signature red tile roof.

Memorial Arch after the 1906 earthquake

In this screencap, Arches on the Quad 1905 is showing as the currently selected POI, even though the photo is part of a different POI.

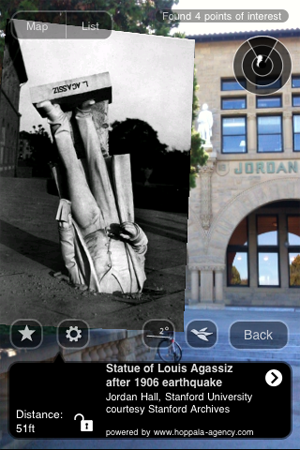
One of the more famous images from post-earthquake Stanford is this one, the statue of Louis Agassiz embedded in a walkway:

Statue of Louis Agassiz 1906

Although the image is scaled a bit too large to see the background well, you can make out that we are in front of Jordan Hall; the white statue mounted above the archway on the left is in fact the same one that is shown in the 1906 photo, nearly undamaged and restored to its original perch.

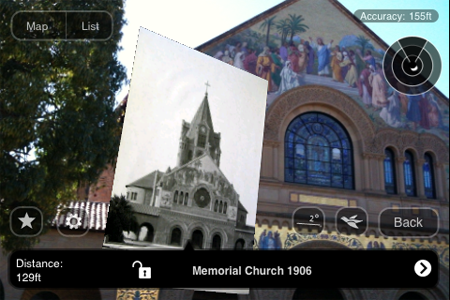
Finally we have this pairing of Memorial Church in 2010 with its 1906 image. In the photo, you can see the huge bell tower that once crowned Mem Chu; this was also later destroyed in the earthquake.

Memorial Church 1906

Each of these images conveys some idea of the potential we see in using AR to tell engaging stories about the world. The similarities and differences seen over the distance of a century are striking, and begin to approach what Reid et al defined as “magic moments” of connection between the virtual and the real [Magic moments in situated mediascapes, pdf]. However, there are many problematic aspects of today’s mobile AR experience that impose significant barriers to reaching those compelling moments. And so, the experiments continue…

augmented reality 4 poets

Thursday, October 21st, 2010

Earlier this month I attended THATCamp Bay Area, a 2-day head-on collision of scholars and practitioners in the humanities with a range of folks from the tech world. It was quite refreshing and challenging to (attempt to) wrap my mind around linguistics, environmental history, experimental poetics and art curation, just to name a few of the disciplines that were represented. Interestingly, I also discovered unexpected hidden connections that led back to the EVOKE Summit and forward to @ubistudio; more about these later perhaps.

My contribution to the fray was a session named “Augmented Reality 4 Poets”, a hands-on workshop on creating basic mobile AR using the Layar platform and Hoppala CMS service, no programming required. It worked out pretty well, and I wanted to share the materials here. I’ll likely reprise some of this in a session at ARDevCamp in December, and possibly at other future events. Anyway, here’s the tutorial. I’ve kept it simple on purpose — both Layar and Hoppala have additional capabilities you should take the time to explore. Also, you’ll see that for THATCamp I made the shared @ubistudio accounts available, but if you want to go through this on your own, you will need to sign up for a Layar developer account and a Hoppala login (it’s easy).

Mobile Augmented Reality for Non-Programmers
A Simple Tutorial for Layar and Hoppala

1. What you need to create your first mobile AR layer:

* A smartphone that supports the Layar AR browser. This means an iPhone 3GS or 4, or an equivalent Android device that has built-in GPS and compass.
* The Layar app, downloaded onto your device from the appropriate app store.
* A computer with web access.
* A developer account with Layar and a login at Hoppala. For this tutorial, you will use our shared ubistudio account. Later, you can request your own at http://site.layar.com/create/start-now/

2. Get connected:

The ubistudio credentials we will be using today are: [redacted]

You should use these credentials to sign in at 3 places:

* The Hoppala website: http://augmentation.hoppala.eu
* The Layar developer website: http://layar.com/publishing
* The Layar app on your device

Because these are shared credentials, you will see other people’s layers in these environments [only true for the shared tutorial account]. PLEASE DON’T TOUCH ;-) There is no undo or undelete!

3. Get started:

Log into Hoppala. You should see the Dashboard, a simple list of layers with Titles, Names and POI URLs.

Hoppala dashboard

At the bottom right of the page, click “Add layer service” to create a new layer. A new line will be added to the list, with “Untitled” and “noname”. On the far right of that line, click the pencil icon and give your layer a new title and name. The name needs to be lowercase alphanumeric. Click the Save button.

Next, click on the name of your new layer. You should see a Google Map. Navigate to our location and zoom in.

Hoppala map view

To add a point of interest (POI), click “Add augment” at bottom right of the page. This will add a basic POI in the center of the map. You can drag it to the location you want.

To customize your new POI, click on it and a popup will launch. The popup has 5 tabs, and we’ll mostly care about the first 3. Each tab is a form we will use to enter data about the POI.

Hoppala POI menu (click for larger view)

GENERAL

* Title and description fields can be whatever you want. Footnote is not editable
* Image is the picture that is displayed for the POI’s information panel in the mobile app view. You can use one of the images already loaded, or you can upload your own from your computer.
* POI Icons are what show up in the AR view for basic POIs. Choose ‘default’, and select a Custom Icon from the drop down list. You can also upload your own.
* BE SURE TO CLICK THE SAVE BUTTON and wait for the confirmation.

MODEL

* For basic POIs, don’t worry about this.
* For images or 3D models, select the appropriate Type.
* Use the pulldown menus to select a preloaded image or model. You can also upload your own. 3D models need to be in a custom Layar l3d format.
* BE SURE TO CLICK THE SAVE BUTTON and wait for the confirmation.

ACTIONS

* In the Layar browser, you can have actions triggered from POIs. These can include going to a website, playing an audio or video, sending an email or text, and making a call.
* If you make changes, BE SURE TO CLICK THE SAVE BUTTON and wait for the confirmation.

You can add more POIs, or move on to testing the layer.

4. Testing your layer:

Log into the Layar developer site. You will see a table of existing layers.

Layar Developer Site (click for larger view)

To add your new layer, click the “Create a layer” button. You will see a popup form.

* Layer name must be exactly the same as the name you chose in Hoppala.
* Title can be a friendly name of your choosing.
* Layer type should be whichever type you have made.
* API endpoint URL is the URL for your layer copied from the Hoppala dashboard (the long ugly one).
* Short description is just some text.

Click Create layer and you should be done!

(There are more editing options, but you can safely ignore them for now).

Start up the Layar app on your mobile device. Be sure you are logged in to the developer account , or you will not see your unpublished test layer. Select “YOURS”, and then “TEST”. You should see several test layers, including your own [different versions of the Layar app may put the TEST listing in different places, so you may need to poke around a bit]. Select your layer and LAUNCH it. Now look for your POIs and see if they came out looking the way you had expected.

Congratulations, you are now an AR author!