Welcome! This tutorial will show you how to create mobile AR using the Layar platform and Hoppala CMS service, with no programming required. I’ve kept it simple on purpose — both Layar and Hoppala have additional capabilities you should take the time to explore; for the technically inclined, the Layar developer wiki is a good place to start.
Mobile Augmented Reality for Non-Programmers
A Simple Tutorial for Layar and Hoppala
1. What you need to create your first mobile AR layer:
* A smartphone that supports the Layar AR browser. This means an iPhone 3GS or 4, or an equivalent Android device that has built-in GPS and compass. As of March 2011, Symbian S3 and S60 devices should also work, as should the Apple iPad2.
* The Layar app, downloaded onto your device from the appropriate app store.
* A computer with web access.
2. Get connected:
You’ll need to create a developer account with Layar and an account on the Hoppala Augmentation content management system (CMS). This should only take a few minutes:
* The Hoppala website: http://augmentation.hoppala.eu
* The Layar developer website: http://layar.com/publishing
Once you have your accounts, sign in to both sites and to the Layar app on your device.
3. Get started:
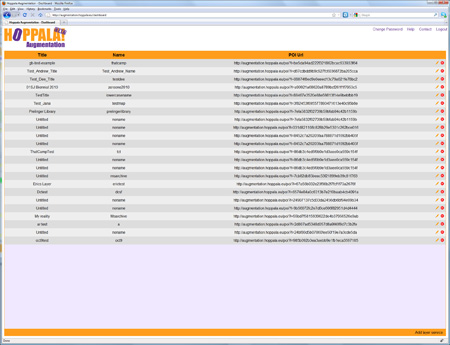
When you log into Hoppala, you should see the Dashboard, a simple list of your layers with Titles, Names and Overlay URLs.
At the bottom right of the page, click Add Overlay to create a new layer. A new entry will be added to the list, with Untitled, noname and a long, ugly URL. On the far right of that entry line, click the pencil icon to edit and give your layer a new title and name. The name needs to be all lowercase alphanumeric. Click the Save button.
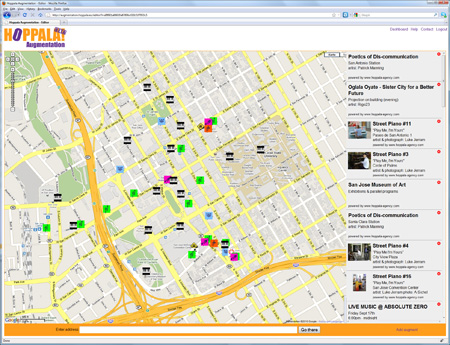
Next, click on the name of your new layer. This will open a Google Map-based page. Use the map controls or enter your address to navigate to your current location and zoom in.
To add a point of interest (POI), click Add augment at bottom right of the page. This will add a basic POI called Untitled in the center of the map. You can drag it to the location you want.
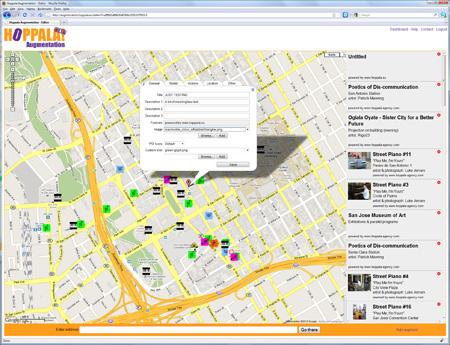
To customize your new POI, click on the red map pin and a popup will open. The popup has 4 tabs, labeled General, Assets, Actions and Location. Each tab is a form we will use to enter data about the POI. For now, don’t worry about the Location tab.
GENERAL
* The title and description fields can be whatever text you want. The title is limited to 60 characters, and each description line can be 35 characters. Note that long text strings may not display fully on a small device screen. Try typing HELLO WORLD as your title.
* Thumbnail is the picture that is displayed in the POI’s information panel in the mobile app view. You can upload your own thumbnail from your computer by using Choose File and then Add.
* You can ignore the Footnote and Filter value fields for now.
* BE SURE TO CLICK THE SAVE BUTTON and wait for the confirmation.
ASSETS
* Icons are the small graphics that show up in the AR view for basic POIs. Choose default (you can create custom icons later if you like).
* Assets are 2D images or 3D objects that appear in the AR view. You can upload your own assets using Choose File and then Add. Images can be .jpg or .png; 3D objects must be in Layar’s .l3d format.
* Note that Hoppala supports some non-Layar AR browsers. You can ignore any sections for “junaio” and “Wikitude”.
* BE SURE TO CLICK THE SAVE BUTTON and wait for the confirmation.
ACTIONS
* In the Layar browser, you can have actions triggered from POIs. These can include going to a website, playing an audio or video, sending a tweet, an email or text, and making a phone call.
* Hoppala allows you to include up to 8 actions per POI.
* Actions can appear as buttons for the user to click, or they can be auto-triggered based on the user’s proximity to the POI location.
* Try adding a link to a website. For Label, type Google. Select ‘Website’ in the pulldown menu. Type http://google.com for the URL.
* BE SURE TO CLICK THE SAVE BUTTON and wait for the confirmation.
You can add more POIs, or move on to configuring and testing the layer.
4. Configure your layer:
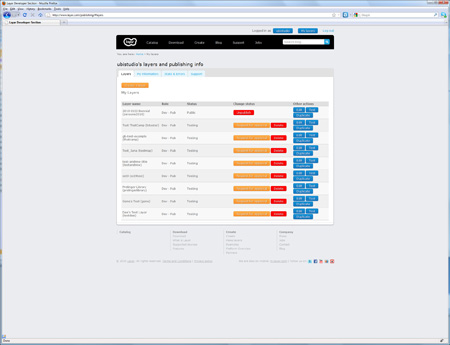
Log into the Layar developer site. At the top right of the page, click My Layers and you will see a table of your existing layers, if any.
To add your new layer, click the Create a layer button. You will see a popup form.
* Layer name must be exactly the same as the name you chose in Hoppala.
* Title can be a friendly name of your choosing.
* Layer type should be whichever type you have made. If you used a 2D image or 3D model as an asset, select ‘3D and 2D objects in 3D space’.
* API endpoint URL is the URL for your layer, which you can copy from the Hoppala dashboard (the long ugly one).
* Short description is just some text.
Click Create layer and you should be done!
(There are lots more editing options, but you can safely ignore them for now).
5. Test your layer:
Start up the Layar app on your mobile device. Be sure you are logged in to your Layar developer account, or you will not see your unpublished test layer. Select LAYERS, and then TEST. You should see your test layer listed. Note: older versions of the Layar app may put the TEST listing in different places, so you may need to poke around a bit. Select your layer and LAUNCH it. Now look for your POIs and see if they came out looking the way you had expected.
Congratulations, you are now an AR author!


